A classic Greek recipe Tzatziki is made from just a few ingredients, of grated cucumber, olive oil and yoghurt.

Tzatziki, tzadziki or tsatsiki is easier to make than it is to say. A classic Greek recipe it is made from just a few ingredients, of grated cucumber, olive oil and yoghurt. Any other additions are at the cook’s discretion. Once mastered you’ll never go back to the shop bought variety. You’ll serve it at every BBQ you can, as it’s a cracking accompaniment to meat, and especially grilled lamb.
(serves 2)
Put the lamb rumps in a bowl and pour the lemon (or lime) juice over them.ÌýSprinkle over the Moroccan Spice and rub it in, to make sure the whole rump is covered. Use a little bit more if needed. Pop it in the fridge, and let it marinate for at least 30 mins. While it’s marinating and soaking up those lovely Moroccan flavours, you can make the Tzatziki.
Peel a cucumber, using a vegetable peeler, and then cut half. You need to remove the seeds, as otherwise it will change the consistency of the finish, and it just won’t be the same. A teaspoon is sometimes useful for removing the seeds.
When deseeded, you want to finely chop it or even better (and easier), grate it. Then you need to leave it in a colander or sieve with a little rock salt. Salting the cucumber stops the sauce from becoming watery and thin, as it draws out water and gives it flavour. Whether you grate or chop, you cannot skip this step. It’s crucial.Ìý
After 10 mins or so, pat the cucumber dry with kitchen towels then stir in a teaspoon of good olive oil and then fold in the yogurt. Season with a crushed clove of garlic and a squeeze of lemon juice.
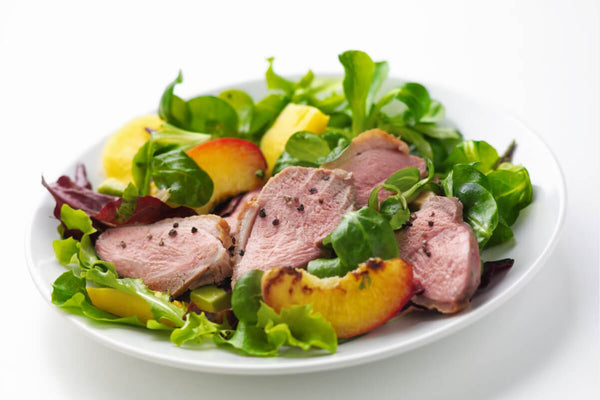
Cook the lamb rump of the BBQ or grill for 3-4 minutes each side. It’s best to try and flip them the once to allow the meat to caramelise and char. It’s important when grilling lamb on the BBQ that your charcoal is white and at optimum cooking heat. Fat will come out and flame the grill, so you don’t really won’t too many flames when you start cooking. If this does happen and you think the lamb is cooking too quickly or burning, move the steak to the cooler side of the grill.
Once cooked, take the rump from the grill and leave it to rest for 2-3 minutes. This will allow the meat to relax and distribute the juices across the meat fibres. Trust us, you don’t want to skip this step now you’re so close to the line.
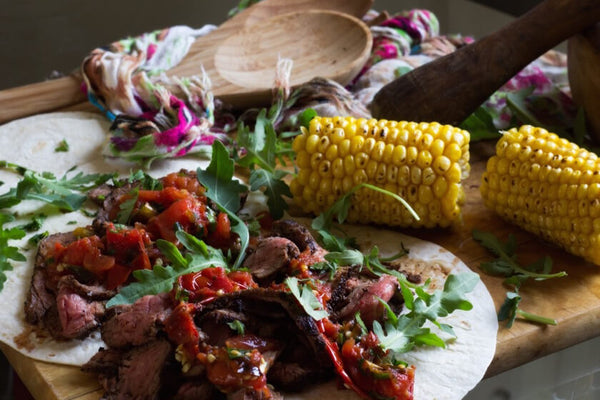
Carve the lamb into even slices. Warm the pittas,Ìýsplit them in half, and divide the lettuce and red onion between them. Top with the lamb, squeeze over the lemon juice and serveÌýwithÌýthe tzatziki.Ìý
Taste the summer at home!
]]>The country is about to celebrate theÌý75th anniversary ofÌýVE Day in very different circumstances due to lockdown.ÌýThere will be lots of scaled back garden celebrations, andÌý we thought it was high-time we made the case for celebrating with a quintessentially British tradition. Great British Coronation Chicken.

Ìý
It's much easier to make than you think, and it tastes far superior than a shop bought variety. It's guaranteed to spice up your day, and by starting your own family tradition, you certainly won't go back to shop bought again.
Created in 1953 , it was a popular party dish in the 1970s and 1980s. Nowadays Coronation Chicken probably isn't held inÌýsuch high regard, but we think it should be.
It's reputation was damaged,Ìýmainly because of substandard buffets the length and breadth of Britain, and the fact that we don’t cater for flavour enough at a buffet now. If it’s not a beige food, that comes pre-cooked it probably won’t make it to the buffet table - (before you start we do realise the irony here as Coronation Chicken is browny beige itself, but you know what we mean).
You really should give it another go if you are having a family gathering to celebrate VE Day. It's much easier to make than you think, and it tastes far superior than a shop bought variety. It's guaranteed to spice up your day, and by starting your own family tradition, you certainly won't go back to shop bought again. You can use whatever heat curry powder you want depending on taste. We've used Madras which gives a lovely spicy kick, but you can tone that down if you prefer.
(Serves 6)
Cook the chicken in your preferred way. We like to steam it scattered with the lemon zest for 25 minutes, to give it a juicy flavour. When it’s cooked, set it aside to cool.
In a small pan, melt the butter and then add the shallot or onion and cook gently for 4-5 minutes until nice and soft and translucent. Stir in the curry powder, tomato puree, wine and lemon juice. Simmer uncovered for about 5 minutes until the liquid has reduced by at least half.
Take the pan off the heat and then stir in the apricot jam, mayonnaise, yogurt, coriander and salt and pepper to taste. Mix thoroughly and then set the pan aside to cool.
Fold the chicken into the mixture with a wooden spoon or spatula. If the chicken is diced larger than you’d prefer on a sandwich, cut it into smaller bite size pieces.
Adjust the seasoning to taste and serve on whatever type of bread you fancy - sourdough, naan, or pitta all work well, but our favourite is on a nice fresh bread roll, cut in half and served as an open sandwich, with some green salad - old skool buffet style!
Happy Eating :-)

this is definitely a recipe for a weekend or holiday when you’ve got time on your side, but trust us it’s worth it as the results will likely be remembered for a lifetime.

Steak pudding is one of the great foods from yesteryear and is a real British culinary tradition that we think should be more in favour than it currently is. Yes it is pretty calorific, but nothing evokes comfort eating more than a traditional steamed steak pudding. Lot’s of us will have cherished memories of meals such as this round our grandparents tables, and by embracing such foods as your own you can carry on a great food tradition with your own family. Making a suet crust is far easier than you think, and basically if you can make dumplings, you can make suet pastry.
The steak filling will take a good few hours to reach perfection, and the pudding itself needs steaming for a further two hours, so this is definitely a recipe for a weekend or holiday when you’ve got time on your side, but trust us it’s worth it as the results will likely be remembered for a lifetime. We have used IPA instead of a traditional ale, as it’s rounded flavour cuts through the richness, but any ale or beer you have will do the job just fine.
For the pastry
Start by making the filling. Put the beef in a large bowl and mix in the flour so all (or most) of the diced beef has a nice thin coating of flour. Heat 1 tsp oil in a large heavy based pan and brown the meat all over. You might need to do this in batches otherwise you’ll overcrowd the pan, so add the other spoonful of oil for the second batch, and use more if needed. When the meat is browned, put it to one side, and cook the onions over a low heat until softened for about 5 minutes, giving them a stir as you go along. Stir the browned meat back in the pan with the onions, and give everything a good stir around.
Pour in about a third of the beer to deglaze the bottom of the pan, stirring it hard with a wooden spoon to lift any sediment off the base of the pan. Pour in the rest of the IPA along with the beef stock, tomato puree, bay leaf and a good pinch each of salt and pepper. Bringing it to the boil, then simmer gently over a low heat for 2 hours, giving it a stir every 30 minutes or so. The sauce (or more to the point the gravy) needs to thicken at this point so don't rush it.
Set aside to cool completely.
When you are ready to make the pudding, start by greasing a pudding basin (approx 1 litre size). Then in a large bowl, mix the flour, suet and baking powder, with a pinch of salt and pepper. Pour in most of the water and mix it (ideally using one hand if possible) into a soft almost sticky dough, adding more water if needed. Divide the dough into two pieces - roughly three-quarters and one-quarter.
Dust your surface with flour and roll out the larger piece of dough into a circle about 30cm in diameter. Use that piece to line the pudding basin, leaving the excess pastry hanging over the edge of the bowl.
Roll out the smaller piece into a circle, big enough to form the lid for the basin. Spoon or ladle the cooled steak filling into the pastry-lined basin, and then dampen the edges with some water before placing the lid on top. Press the edges together with your fingers and trim away the excess pastry. If you are feeling confident, and want a traditional finish, you can crimp the edges to ensure a good seal.
Next place a large piece of parchment paper on a sheet of foil (or use parchment lined foil) and make a large pleat in the middle, folding both sheets together. Lay the parchment and foil over the top of the pudding basin (foil side up) and secure it with string, looping the string over the pudding and tying it to form a handle that you can use to lift the pudding in and out of the saucepan.
Stand the pudding in a large pan, and pour in boiling water so that it comes to halfway up the side of the pudding basin. Put a lid on the pan and bring the water to a simmer. Lower the heat to maintain a simmer and steam the pudding for 2 hours (maybe 30 minutes longer). Top up the boiling water if needed during the steaming so the pan doesn’t dry.
Lift the basin out of the pan, then take off the foil and parchment and leave it to rest for 5 minutes. To get the pudding out of the basin, run the tip of a small sharp knife around the side of the pudding to release it from the basin. Put a large plate over the pudding as an inverted lid, and turn the plate and pudding over, so the pudding comes out on the plate.
Serve it straight away with whatever your comfort veg of choice is, but we think creamy mashed potato, carrots and broccoli are great.
]]>We’ve found using good old Scotch Whisky is actually better at cutting through the gelatinous and creamy flavour of slow-cooked pork. We think it gives it a more rounded flavour, and balances better against the sweet flavours of the meat rub.

Bourbon (and in particular JD) tends to be cited as the perfect extra added ingredient for pulled pork recipes. We’re not sure whether this is due to geography, clever marketing or genuine preference, but we’ve found using good old Scotch Whisky is actually better at cutting through the gelatinous and creamy flavour of slow-cooked pork. We think it gives it a more rounded flavour, and balances better against the sweet flavours of the meat rub.
You can use pretty much any meat rub you want on this recipe (Cajun, BBQ, Chilli etc), or even make your own, which is super simple to do by combining 2 tsp salt, with 2 tbsp dark brown sugar and 2 tbsp paprika. We’ve used our Fire-Pit BBQ Rub as it works great with the sauce created by the whiskey and coke, but feel free to try your own, we’d love to hear what you come up with.
Serves 8
Prep time : 20 minutes
Cooking time : 8-9 hours
Ingredients

Cooking Instructions
Remove the string from the pork, and unroll it. It is best to remove the rind and the skin with a sharp knife when it’s going in a slow cooker. You don’t need to get it all off, and it doesn’t need to be expertly cut, just get the majority of the rind off before cooking. That said, some people like the rind left on during cooking as they think it helps with basting. In that case, remove it at the end before shredding - it’s entirely up to you.
When the pork is unrolled, pat it dry with kitchen paper, and then sprinkle the rub on. It’s called a ‘rub’ for a reason so you need to get your hands dirty and rub it all over the pork, massaging it into the meat for the best flavour. Don’t be gentle with it, you can’t break it, get stuck in and rub it into the meat for maximum flavour. Roll the meat back up as best you can, but you don’t need to re-tie, it is good to go as it is.
Put the pork joint in a slow cooker, and pour in the whisky and coke, and then cover with the lid. You want to cook it on low for 8-9 hours, until it is nice and tender, falling apart and ready to be pulled. This means you’ve pretty much got the full day to do what you want while it is cooking, which could even involve going to work!
When it is finished, take the pork from the . Cut off and discard the rind (if you haven’t already), and wrap the pork in foil, and leave it to rest for 30 minutes. It is really important you don’t skip this step, as it is during this resting period that the real ‘meat magic’ happens and the juices are evenly distributed. This is what gives you that lovely juicy flavour we all love with pulled pork, so we’ll say it again - please do not skip this step!

Pull the pork by shredding it with two forks, to give you beautifully tender pulled pork. You can stir in a couple of spoonfuls of the cooking juices if you wish to add some more moisture to the pork, which is what we like to do. ÌýIf you’ve cooked with the rind on, we’d advise not to add any liquid as the juices will likely be fatty (which is another reason you might want to trim it off before cooking).
Serve in bread rolls, with as many side dishes as you like, coleslaw, potato salad, sweet potato wedges and corn on the cob being some obvious choices from our friends in America, but we think there is something amazingly simple about serving it with a good dollop of apple sauce and some quick stuffing.
Happy eating :-)
]]>In the last century, the human diet has changed more dramatically than at any other time in our existence. As food became cheaper and more available, we increased our calorie intake and became a larger and heavier society. Until fairly recently animal fat was an important part of our diet, but then it became ‘healthy eating’ enemy number one, and we hugely reduced the amount of animal fat we ate.

We now eat more trans fat, more sugars, more processed foods, and more vegetable oils than at any other time in history. Yet after more than 30 years of reducing the intake of animal fats, we are not healthier, just heavier. We need to stop and have a think about what we are eating and why. Our experiment with reducing fat hasn’t worked, it’s just made food taste worse.
It turned out that diets low in fat, leave people feeling hungry, depressed and prone to illness and weight gain. We replaced the reduced animal fat in our diet with sugars and other refined carbohydrates, which essentially got us fat. We replaced animal fats with man-made hydrogenated fats which are full of trans fat, which are difficult for our body to break down and process, so instead we store them as fat. They increase LDL and lower HDL which adversely affects cholesterol, and they promote diabetes and obesity by interfering with insulin production.
The other fats we’ve replaced animal fats with are polyunsaturated fats, used for cooking oils. As well as damaging cells, polyunsaturated fats have affected the balance of essential fatty acids (omega-6 and omega-3) in our bodies. Nutritionists recommend ideal consumption of twice as much omega-6 as omega-3 would be most beneficial to us, but we’re currently consuming up to twenty times more omega6 than omega-3, which has been linked to all kinds of issues such as cancer, weight gain and digestive issues. Sources of omega-3 are decreasing, such as meat and butter from grass-fed animals, whereas animals raised on a diet high in grain are full of omega-6.
Fear of fat is pretty much engrained on us, and we must try and alter this perception. While human nutrition is naturally complex, and no two bodies function identically, for the majority of people, eating fat isn’t the ‘health risk’ it was supposed to be. In fact, fat is good.
We need to re-evaluate our relationship with what we eat. Society has become so disconnected from the source of our food that we have now have less knowledge about where it comes from, how we buy it, how we cook it, and what and when we should be eating things. In the simplest terms, our generation has lost the ability and skills required to cook simple meals from scratch. We understand that we have to eat, but unless you cook a meal yourself you don’t understand what you are eating. If we do nothing about this we’ll leave generations behind us to suffer the control of big corporate global giant food producers.
We spend less time than ever sourcing food, preparing food and eating food. That can’t be healthy for society either socially or physically. Cooking and sharing a meal is an essential part of civilisation. It cultivates friendship and family bonding, and is a place to discuss, share and debate ideas.
To pass on this knowledge and understanding of food, we need to do start educating and informing people, especially the young. It’s not about celebrity chefs, social media self publicists or a quick ready-meal in front of the TV. It’s going to require us to become more responsible about where our food comes from, how it is raised, and how it is killed. We need to know how to cook them the best way, possible from the nose through to the tail, including the fat. Only then will be able to restore both our health and also the pleasure of the dinner table and eating.
]]>
Our ever popular turkey breast joint cooking guide is an easy way to master Christmas
If you are wondering how to cook aÌýturkey breast joint, you're in the right place, so don't worry.ÌýTurkey breast jointsÌýare easy to cook, and easy to carve, but the important thing to remember is that these are much smaller than aÌýwhole turkey, and will cook in no time, so don’t make the mistake of overcooking.
Take the joint out of the fridge, remove all packaging and allow the turkey to come up to room temperature, for at least an hour or so. Leave the joint in the netting for roasting, it helps keep the joint a good shape.
Preheat the oven to 190°C/375F/Gas Mk 5 (for fan ovens check manufacturers handbook, but usually you need to reduce heat by 10-20°C).
Cooking times are approx 40 minutes for every 1kg + 20 minutes, so depending on the joint size you have
Spread and smear some butter over the skin, and season with salt and pepper. Put the turkey skin side up in a roasting tin, and pour about 400ml of water into the bottom of the roasting tray. Cover the turkey and the tin loosely with foil.
Uncover the joint 20-25 minutes from the end of the calculated time to allow the skin to crisp up.
Check that the centre of the joint is fully cooked and is piping hot and that the juices run clear when you insert a metal skewer or sharp thin knife. If using an instant read thermometer the internal temperature should be 75°C (165°F) after resting.
After taking it out of the oven, cover the joint in foil and allow it to rest for at least 20-30 minutes. It is really important not to skip this step, as if you carve straight from the oven, the juices will just pour out. Resting continues the cooking process but it allows the meat to equalise temperature throughout, and the juices are distributed evenly, which makes the joint much easier to carve, and all the juices are deliciously retained.
Remove the netting with a knife or pair of scissors and carve the turkey into slices, as thick or as thin as you like.
Enjoy :-)
Please note that these are guidelines only and you should refer to your oven manufacturers guide for clarification. You must always ensure that the centre of the joint is piping hot before serving.
]]>For juicy, melt in the mouth chicken, lots of chefs will turn the bird over during cooking. To an extent it’s an oven version of a chicken rotisserie, (which we all love right?) as it makes sure there is even cooking, as the heat penetrates the bird evenly. This makes sure the meat is nice and moist, and although it takes a bit more care and attention than just whacking it in the oven, it’s definitely worth it, if you like juicy chicken with a lovely crispy skin!

Ìý Ìý ÌýÌý
We'd love to see some upside down chickens on social media, and use #MeatSocially for a chance to winÌýa Monthly Meat Hamper!
]]>
Black pudding is enjoying something of a welcome renaissance of late. Having been disgracefully demonised for a number of years, we are finally recognising this iron packed bundle of joy, for the traditional classic taste sensation that it is, and in our opinion, always has been.
This dish is an adaptation of a recipe in Dan Doherty’s wonderful bookÌýÌýwhich any fan of breakfast and brunch will adore. It would make a lovely stocking filler for Christmas, and realistically you’ll get the benefit from such a good tasty recipe book so it’s worth considering. We all tend to have lots of tasty leftover roasties at Christmas, and this would be a lovely lazy breakfast in bed for your other half one day over the holidays.
The rich taste of the black pudding works really well in a hash dish, especially alongside some good quality leftover roasties. If you haven’t got any leftover you can just quickly chop some potatoes (either old or new) and whack them in the oven for 45 minutes, before using them in this dish. That said, the really beauty of this dish for us, is that if you are using leftovers it means you’re probably a bit worse for wear, but you’re in luck as this is perfect as a weekend hangover dish, that you can be eating it in under 25 minutes.
Slice the black pudding into 2cm slices and then half again, then cut the potatoes roughly into 2cm cubes so they are a similar size to the black pudding.
Melt the spoonful of butter in a frying pan, and fry the potatoes over a medium to low heat for about 5 minutes until they are nice and brown.
Add the onion to the pan and continue to fry gently for another 5 minutes, before adding the black pudding, and seasoning with salt and pepper. Turn the heat down to low and cook through for 5 minutes stirring and flipping everything as you go.
Towards the end of cooking, stir in the brown sauce, and give everything a good stir for another 2 minutes, then cut in some chives.
Split the hash in two and serve it with some thick cut, buttery toast, or best of all, with a fried egg on top. It won’t make your hangover disappear altogether, but you’ll feel a lot bloody better because of it.
]]>
One of the simple truths of life is that even the fussiest eater loves chicken nuggets. While the industrial mass-produced kind are generally pretty awful, by making your own at home you know exactly what you are feeding your kids.
They are super easy to make, and once you get the hang of making some fresh bread crumbs and using them to coat some fresh diced chicken breast, they really do take just minutes to make. You can dice a chicken breast fillet yourself, but you can buy diced chicken breast already cut, which will save you a job. The nuggets cook quickly inside their crispy coating and can be on the table in less than half an hour.
Our recipe uses some clever seasoning tricks to create a savoury flavour that will appeal to kids and adults. Be careful when adding salt and pepper as you don’t want to overseason them, especially for younger children.
Blitz the bread crumbs in a processor, then add the garlic powder and paprika and give it another whizz. Use the spices in small amounts to season rather than flavour. Add salt and pepper if you want, but again be careful not to add too much, as you can get a healthy salt free meal into the kids here.
Get three bowls, and place the breadcrumbs in one, the flour in another, and the beaten egg in a third.
Using one hand for the egg, and your other hand for the dry ingredients, coat each chicken piece in flour, then egg, then breadcrumbs. We’re not going to lie, it can get a bit messy, but it’s also a great opportunity to involve the kids in the dunking and coating.
Heat an inch of vegetable oil in a frying pan until the chicken sizzles when added. You don't want to overcrowd the pan, but by the same token you want enough pieces so that they don’t burn. Controlling heat in this way is the most effective way of cooking them. You’ll probably have at least two batches depending on the size of your pan.
The nuggets will take about 10 minutes to cook. If the oil is too hot they will over brown too quickly, whereas if it is too cold and they will be soggy. If you are using a thermometer, the ideal temperature for the oil is 190℃.
When the chicken is cooked through, remove the nuggets from the pan and ideally place them onto a wire rack to drain. Cook the next batch of nuggets, making sure to allow the oil to return to temperature before you add them to the pan.
Serve immediately with sides and dipe of your (or your kids) choice.
]]>
This is a meal is all about crisp lamb chops, and while you can use a knife and fork, there is something about eating with your fingers that signals spring has sprung, and alfresco dining isn’t too far away. Roasted in the oven with some crushed new potatoes, flavoured with lemon and garlic, this is comfort food with Italian flair.
The peas, along with the bright sunshine lemons, lend a summery shimmer to the dish, but the comfort factor makes it perfect for year round eating. The side dish is our version of an Italian classic; use sweet frozen peas and deli style artichokes tossed together. The peas are hot, while the artichokes are cold and they go together so well. With the crisp lamb and the crunch of the potatoes, they make a memorable yet ridiculously simple meal.
Ingredients
Pre-heat the oven to 190°C
Cook the new potatoes in some salted boiling water for 10-15 minutes. They need to be almost cooked, but still be a touch firm. When cooked through, rinse and allow to cool slightly then crush them with the back of a fork so that they spilt and bash up, but still stay whole. Arrange (or scatter) the potatoes in a decent size baking tray with plenty of room. Mix in the lemon wedges and the garlic cloves. Lay the lamb chops on top of the potatoes and season with salt and pepper then tuck in the rosemary sprigs.
Bake in the oven for about 45 minutes, or until the chops and potatoes have crisped up nicely. You can’t really over-cook them, (especially if eating with your fingers), so don’t worry too much about timing, just have a look and when everything is nice and crispy, take them out. Heat the peas as per packet instructions (probably only 1-2 minutes), tip in the artichokes with their marinade and add the chopped parsley. Stir to combine and serve with the lamb and potato dish.
Nutrition (per serving):
Chicken supremes can be daunting to cook at first, but they really shouldn’t be. The key is to get a lovely crispy skin, (but not burnt), and the best tip we can give you to do that is cooking it on a low heat. The skin becomes crispy and golden, when the layer of fat beneath the chicken skin renders. You can use whatever bacon you like in the risotto as there isn’t enough of it to worry about, but we think it works really well with smoked streaky bacon, as that gives lovely smokey flavour.
Heat the oven to 170°C/gas mark 3
Strip the rosemary and thyme from the stalks and finely chop enough to give you about 1 tbsp, and sprinkle over the chicken supremes, and then season with salt and pepper.
Melt the butter in a large frying pan over a low to medium heat with a glug of olive oil. Fry the chicken, skin side down. You want to allow the fat beneath the skin to render so that the skin becomes golden and crisp. This can take 10-15 minutes and must be done on a low heat, otherwise the skin will burn and scorch. Turn the breasts over and fry for 2-3 minutes on the other side before popping the breasts into a roasting tin in the oven for 20 minutes while you make the risotto.
Once they are cooked, the chicken supremes can be covered in foil and set aside to rest while you finish the risotto, otherwise they might dry up if left in the oven too long.
To make the risotto, cut the bacon into small diced pieces, and cut away the rind to your taste (although we quite like the salty flavour of bacon fat). Thinly slice and dice the shallots and celery, and crush the garlic.
In a large pan gently heat a glug of oil and then fry the bacon pieces. Cook until lightly browned, then add the shallots. Cook over a low heat until the shallots are nice and soft and translucent, then add the celery and garlic, and cook for another 2-3 minutes. Stir in the mushrooms and cook for a further 2 minutes.
Add the rice and give everything a good stir for 30-60 seconds. Then stir in the glass of wine and simmer until it is absorbed into the rice.
Make the stock, in a measuring jug (or pan) and add it to the rice one ladleful at a time. Stir it every now and again until the stock is absorbed, and then add another ladleful. If you don’t have a ladle use half a cup or 150ml each time. It should take about 15-20 minutes until all the stock is used, and then take off the heat.
The risotto should have a slight al-dente bite, but the mixture will be nice and sloppy, especially when you stir in the soft cheese. The heat from the mixture should melt the cheese as you stir, so there should be no need to heat it through. Season to taste, and stir in some chopped parsley.
Carve the chicken supreme breasts into 2 or 3 slices, cutting them on the diagonal. Serve a small mound of risotto on each plate, topped with a carved chicken supreme.
]]>
Do you like a breast or a thigh? It sounds like a line from a 70s sitcom, but as we're now in British Pie week, (6-12 March) we've been developing some Pie recipes using chicken thighÌýas a replacement to the more common breast filling. It helps keep costs low and the combination of white and dark meat found in the thigh, gives more flavour when combined with pastry.
Originating at Midlands football grounds in the late-1990s, the balti pie is now synonymous with British Football culture and has become an adopted classic. That said, most people’s experience of a balti pie is generally a shop bought variety, but that needed not be the case, as they’re much easier to make than you’d expect.
If you’ve got your own special recipe for pastry feel free to use that, but we aren’t that clever and tend to use the ready made bought variety, and so do lots of celeb chefs in their cookbooks so we don’t mind that to make things quicker and easier. We've used chicken thighs rather than breast, as we think the mixture of white and dark meat on chicken thigh makes an ideal pie mixture, but if you prefer only breast meat use 500g diced chicken breast or 2 x chicken breast filletsÌýinstead
Serves 4 - (Makes 1 Large Pie or 4 individual Pies)
Pre-heat the oven too 180ºC/gas mark 5
Cook the chicken thighs, ideally roasting, until fully cooked for about 20 minutes. When cooked, set aside and allow to cool.
Melt the butter in a pan and fry the shallot, then add the leek and garlic, and fry for about 5 minutes until everything is softened.
Stir in the flour and all the spices and then gradually add the stock, mixing and stirring over a low heat until the flour is cooked out.
Turn the heat off, then strip and dice the chicken meat from the thigh. You don’t want the skin so have that as a cooks bonus treat, and stir in the chicken and coriander to the ballot mix. Put the mixture aside and allow it to cool a little.
Roll or cut the pastry to give a third of the pastry for the pie top and use the larger piece to line a pie dish, and fill with the chicken mixture. Cover with the remaining piece of pastry and then pinch and crimp around the edges to seal it all together.
]]>
Beef shin stew was a firm family favourite when I was growing up. My gran used to make the best beef stew, using shin of beef. She would use beef dripping to brown the beef first, and while you can use vegetable oil instead, the dripping does add a layer of depth and melt-in-the-mouth flavour to the stew, so if you can, try and get hold of some (it will last ages in the fridge, and makes amazing chips and roasties too).
This is a very simple and straightforward stew. Most chef recipes involve a lot of ingredients, faff, red wine and vinegars, when it comes to stews, but I don’t remember any of that when I was a kid. Our grandparents generation tended to be more traditional with less fuss, and this stew is no different, it is back to basics cooking. It doesn’t even use a stock, as the shin creates a thick enough liquor without it. You’ll be left with a traditional beef shin stew, that is easy to cook, evokes nostalgia in your tastebuds, is filling and is truly melt in the mouth.
Cut the shin into large pieces of about 4cm cubes. They don’t need to be uniform, as you are going to cook it until it falls apart, and you can do it smaller, if you are cooking for children as well, but there is something wonderful about big chunks of meat in a stew. You can trim the shin of any fat if you want, but don’t worry too much about it, fat adds to the flavour, so it is fine if you are leaving it on there.
Mix the flour and mustard in a large bowl, and then put the meat in the bowl, and coat the shin with the seasoned flour. If you don’t have mustard powder, you could use a tsp of mustard stirred into the stew itself, but try and get a tin of mustard powder if you can, as it’s really handy for lots of recipes, and it lasts for ages.
Heat the dripping (or oil) in a large pan on a medium heat, and then add the beef and brown it all over, for about 8-10 minutes. You might need to do this in batches, depending on the size of your pan. Add the onion and stir occasionally while they cook until they are nice and soft, which will be about 10 minutes.
Stir in the water, season with salt and pepper, and then bring it up to a nice boil, before turning it down to low, covering the pan and simmering gently for 1 hour. After the hour, you can skim any excess fat from the top if you think there is too much, and then add the carrot, celery, swede and bay leaf, and cook for another two and a half hours (150 minutes), until the meat is completely tender.
After cooking you can let it sit and rest for 10-15 minutes, before serving with either herb dumplings, cooked in the stew for the last 30 minutes, or creamy mashed potatoes, or even both!
So that is it - an easy cook melt in the mouth beef shin stew - order some Beef Shin and give it a go.
Kcal 273g, Carbs 15g, Fat 8g, Protein 35g, Salt 35g, Sugar 5g
]]>
Leftover Pulled Pork Hash is an awesome way of using up any leftover pulled pork you may have. The lovely people at Love Pork have a load ofÌý, but our favourite thing is to make this easy cook hash, which is great for breakfast, lunch or even dinner.
We’re taking it for granted that you know how to make pulled pork, and that you got a big enough joint to have leftovers. Anything over 2kg should probably do the job, but it depends how many hungry mouths you were feeding the day before. Meat fans will probably know that theÌýBoston ButtÌýis the best joint for pulled pork, but any cut of pork shoulder will do the job very nicely.
As this is a left-overs recipe you don’t need to stick to it to the letter, and you should use it as a sort of guide only. Over time you’ll no doubt develop your own recipe as you can make it in a number of ways, and we’re well aware that if you are making this for a post-bbq breakfast you may well have a hangover so going to get ingredients from the shop might not be an option, so all you really need are the pulled pork, onions and potatoes, everything else is optional.
Serves 4
Preheat the oven to 180ºC Fan/Gas Mark 6
Boil the potatoes in salted water, and when cooked ready for mashing, drain and leave to cool.
In a fairly large pan, fry the onions in the oil on a low heat for 3-4 minutes until they are nice and soft, then stir in the thyme and cook for a further 2-3 minutes.
Add the pulled pork, marmite, cajun and stock, stir everything well and heat through for 2-3 minutes to slightly reduce.
Mash the potatoes with the milk and butter.
Put the pulled pork mixture into an ovenproof dish (or individual pie dishes)and top with a layer of mashed potatoes, you want about a 1cm layer, but not too thick.
Mix the breadcrumbs with the grated cheese, and sprinkle over the mash topping, then bake in the oven for 15-20 minutes until the top has a nice brown crust.
Serve it on it’s own or with whatever you have to hand, either some leftover salad, coleslaw, red cabbage, or top with a fried egg.
]]>
Here’s a great dish to sort out your supper plans withÌýBavette steak, alongside some lovely seasonal veg, which we picked straight from the allotment, for this recipe and you can hopefully see the freshness in the picture.
This recipe idea lends more than a nod of the cap to TV chef Tom Kerridge, as the 2-Michelin-starred chef is a big fan of bavette, which makes us like him even more.
Cut from the flank, bavette steaks give a somewhat more fatty, but very delicious steak. It’s not for everyone due to the strong flavour, which is why we think it works so well with the earthy flavours of pulses and mushrooms. Bavette is best served rare to medium-rare as it is too thin to cook well done, but feel free to serve as you like.
Take the steak from the fridge and let it come up to room temperature (so at least 30 minutes or so).
Bring a large pan of salted water to the boil, and cook the potatoes until tender. While the potatoes are cooking, you can prepare the steak.
Season the steak to taste, and the heat a little butter and oil in a heavy-based frying pan until hot.
Chuck the steak in the hot pan and cook fast until rare (about 2 minutes each side) otherwise it will become tough and you’ll lose the strong flavour bavette has. Remove the steak from the pan and set aside to rest, either in foil or a warm place.
Drain any excess fat from the pan and put the pan back over a low heat. Cook the mushrooms gently for 1-2 minutes then stir in broad beans and cook for another minute.
Add the cream and chicken stock and gently warm. Stir in a good spoonful of steak rub, and warm through for another 30-60 seconds being careful not to boil.
Pour the broad bean and mushroom sauce over the steak and serve with the potatoes. Enjoy :-)
]]>
We have used our fabulous flat iron steaks for this easy recipe, but you could use any steak you wanted. Flat iron steaks cost less than the prime steak cuts but are just as tender and have a far meatier flavour. Served this way, two steaks will easily serve four people.
When cooking steak that is destined to be eaten as strips it is always best to cook it as a whole steak and then carve. That way, flavour and texture are kept to a maximum. It is a good rule of thumb, to aim for medium cooked steak, especially with thinner steaks such as the flat iron.
Cooking a flat iron steak, or any other steak that follows the muscle, as oppose to crossing it, takes it cue from both flatter steaks such as sirloin, and fatter steaks such as fillet. The muscle fibres have a tendency to bunch together, and the girth of the steak becomes wider. To cook the steak right through, without charring the exterior too far, takes a keen eye and controlled heat. A decent frying pan, preferably cast iron, (certainly not non-stick) is essential. A heat source that reacts immediately is a bonus, yet not essential.
To garnish the flavourful tender steak, we have opted for soft tacos, corn or wheat, a super easy fresh warm salsa, and corn cobs drenched in maple butter. A side of leafy salad goes down well too.
Preparation Time: 15 minutes Cooking Time: 30 minutes Total Time: 45 minutes Servings: 4
Rub each side of the steaks with oil, and then put 1 tsp of rub on each side and set aside to come up to room temperature.
Place the corn cobs in a large pan of boiling, not salted water (as salt makes the kernels tough).
Add a drop of olive oil to a frying pan and add the whole tomatoes and chillies. Leave the seeds in the salsa, so it is pretty hot, you could serve yoghurt or soured cream to cool things down if needed.
Cook the chillies and tomatoes over a high heat, shaking the pan regularly, so that the insides soften slightly and the flesh chars. Once done, tip into a bowl and add a generous pinch of salt, with a tbsp of oil and the lime juice. Mash together to a rough textured sauce. If you are having trouble, try snipping into the obstinate bits with a pair of kitchen scissors. Add the coriander at the table once the salsa has cooled a little.
Heat a frying pan to a high heat. When the pan is hot enough, a flick of water will sizzle viciously. Lay the steaks in the pan, and give them 2 minutes on each side. Depending on how the outside is looking, you may want to turn the heat down a little now. Because of the spices, it will be blackened, and the meat can take a good crust before burning, but it all depends on the heat source and the pan. Flat irons will probably take a further 2 minutes on each side and still be medium, so turn the heat down a little bit if you are concerned.
When cooked remove the steaks to a warm plate and allow them to rest for at least 5 minutes while you warm the breads and get ready to serve.
Drain the water from the cobs, add butter, salt and maple syrup. Toss together in the pan.
Cut the steaks into thin slices and serve on the breads with salsa and a fistful of leafy salad. When your mouth gets hot, take a bite of corn. Enjoy.
Nutrition (per serving): 323 calories, 14.8g total fat, 6.4g saturated fat, 21.7g carbohydrates, 9.1g sugar, 30.6g protein,
]]>
Although mint sauce is the accompaniment we naturally associate with lamb, the marriage of rosemary and lamb is a happy one, which you should familiarise yourself with, especially in the autumn, whenÌýBritish lamb shanksÌýare especially good because they come from spring born lambs that have grazed on lush hillside grass lands and heather all summer long. In our opinion this gives the lamb shanks a natural sweetness, which compliments the twiggy almost sharp flavour of the rosemary.
Rosemary is a synch to grow at home in a small pot, indoors or outdoors, and it flowers in early spring, and then on and off throughout to autumn. Along with lamb, it's also worth trying with beef, as although not very common here, Italians often insert the whole twig into a whole beef fillet much as we do with lamb. If you want an even easier place to start with rosemary try tossing some roast potatoes in a handful of chopped rosemary for the last 20 mins of cooking – yum yum!
This recipe suggestion uses foil parcels cooked in the oven, but it would work equally well in a slow cooker, for those of you that prefer that style of cooking. It's really easy to prepare, and because our lamb shanks are restaurant standard it makes a perfect main course for a dinner party.
(Serves 4)
Preheat the oven to 150°C/300°F/gas 2. and then make small cuts all over the lamb shanks and insert a sliver of garlic into each cut.
Cream the butter with eight anchovy fillets and the rosemary (you can use a food processor if you prefer. Using your finger tips (or the back of a spoon), rub the flavoured butter over the lamb shanks.
Cut four arm-length (50 cm) pieces of tin foil and fold them in half, than wash, peel and slice the leek and carrots, and then divide them in four and place them in the centre of each piece of foil.
Place the lamb shanks on top of the leek and carrots (bone side up) and then pull up the sides of the foil around the shank. Pour a swig of red wine over the veg at the bottom of the foil parcel, season the lamb and veg to taste with sea salt and pepper, and then gather the foil around the bone and pinch and wrap it together (just as you would with a jacket potato). Repeat for the other three shanks, and then place on a baking sheet, bone side up and cook in the oven for 3½ to 4 hours. Check the parcels after 2 hours and if needed add another glug of wine to keep things moist.
Take the parcels out of the oven and allow to rest for 10-15 minutes before serving with some simple potatoes (either mash or roasted). If sharing the experience is your thing, you can serve the lamb shank parcels still wrapped so your guests can open them up themselves.
]]>
Many people think of duck as being difficult to cook but it really is much more simple than you may think and can be cooked in much the same way that you would cook chicken. Like steak duck can be cooked rare, medium or well done and everyone has their own preference.
We asked our friends at to send us a recipe to inspire us for summer and here's what the sent :-)
Pre heat the oven to 180oC, 160oC Fan, Gas mark 4
Prepare the duck breast by scoring the skin 6 -8 times and season both sides with salt and pepper.
Place the breasts skin side down in a cold pan with no oil on a low to medium heat. Cook for approx 6-10 minutes, occasionally pouring off any excess fat. When the skin is crisp and golden, turn breasts over, quickly seal and then place skin side down back in the pan and put into the oven (if your pan is not oven proof, place on a baking tray).
Cook for 6-15 minutes depending on how you prefer your duck cooked.
Remove the duck from the oven, turn breasts over so skin is facing up and allow to rest for 10 minutes in a warm area.
While the duck is resting you can prepare the salad by searing the halved peaches in a hot pan for a minute. Then tumble the lamb lettuce with the mixed leaves and olive oil in a bowl, and divide between 4 plates.
Evenly distribute the mango, avocado and peach onto the leaves. Thinly slice the now rested duck breast and arrange on top and finish with a squeeze of fresh lime. Enjoy!

After spending the festive period in Vietnam and travelling the length of the country via overnight trains and coaches, I’ve certainly had my eyes opened – particularly when it comes to food. As you would expect, Vietnamese cuisine leads with Asian flavours and thanks to its history as a French colony, is heavily influenced by Europe too.
Whether in the North or South of the country I can say hand on heart everything we ate was bursting with flavour and so fresh. Even the street food, which tested my English sensibilities, was mouth-wateringly good. In the towns we were occupied with a variety of noodle and rice dishes which came in soup or stir fry formats and always had an endless supply of fresh herbs to add. On the coast, the speciality was barbecuing the catch of the day and we enjoyed hand-sized tiger prawns, clams and squid, alongside speciality crocodile and snake!
What struck me about how the Vietnamese eat is the occasion of meal times. Ingredients are bought from the plethora of street and night markets and then a cooking station is effortlessly established on the side of the road, quickly populated with a congregation of hungry locals, at any time of the day!
We were so taken with the cuisine that we booked onto a cookery course and since being home have already tested our culinary learnings again. Alongside the prawn spring rolls and banana leaf fish dishes we made, one of our favoured from the cookery demonstration was a spicy beef salad.
Below I have shared the ingredients and instructions for the salad – I hope you too enjoy a taste of Vietnam.
Hoi An Beef Salad (serves four people)
Marinade mixture
Salad ingredients
Salad dressing
Salad topping
Marinate the beef strips in the marinade mixture for one to three hours (the longer the better). Grill or barbeque the beef on a high flame, then allow to cool for two minutes. Place the salad mixture into a large bowl and toss with the dressing. Add the beef and mix gently. Move mixture to a serving bowl and sprinkle on the topping. Transfer to small bowls and serve (best eaten with chopsticks!).
Georgina Dunkley is Head ofÌýPR agency,

serves 6
Take the beef out of the fridge at least 30 mins before you intend to cook it, to allow it to come to room temperature, and avoid burning.
Grind the coriander, salt and pepper in a pestle and mortar and then mix in the herbs. Sprinkle the mix evenly over a chopping board, then roll the Beef Fillet Tails over the board, making sure the mix sticks to the meat. Make up some more mixture if needed for the other tails.
Sear the meat on a hot barbecue until it is brown and crispy on all sides. Barbecue tongs are great for this, to keep the tails turning over. When seared take the tails off the barbecue and leave them to rest on a plate in foil for 5 minutes. Slice the fillet tails as thinly as possible and lay on a large plate to serve with a salad of your choice. We like it with a mix salad of rocket, beetroot and Parmesan, but it works with almost any salad.Ìý

Not just the domain of Chinese takeaways, chicken and sweetcorn soup is the ideal way to make chicken breast go a long way.</p>

Comfort food for whenever it's needed most. You can substitute cream for crème fraiche for a healthier alternative, but then again, where is the comfort in that?</p>